ro-drums-909 user guide
ro-drums-909 runs the TR-909's own sequencer program: what you know from a TR-909 applies here, and the procedures below are the owner's manual's. Installing is on the download page; the ROM folder, artwork files, the update check and contact are on Support.
Getting started
The first start
The sequencer program and the hi-hat's, crash's and ride's samples are in ROMs, Roland's copyrighted work, so Lemus doesn't include them. The first time ro-drums-909 starts without its program ROM, it asks how to continue.
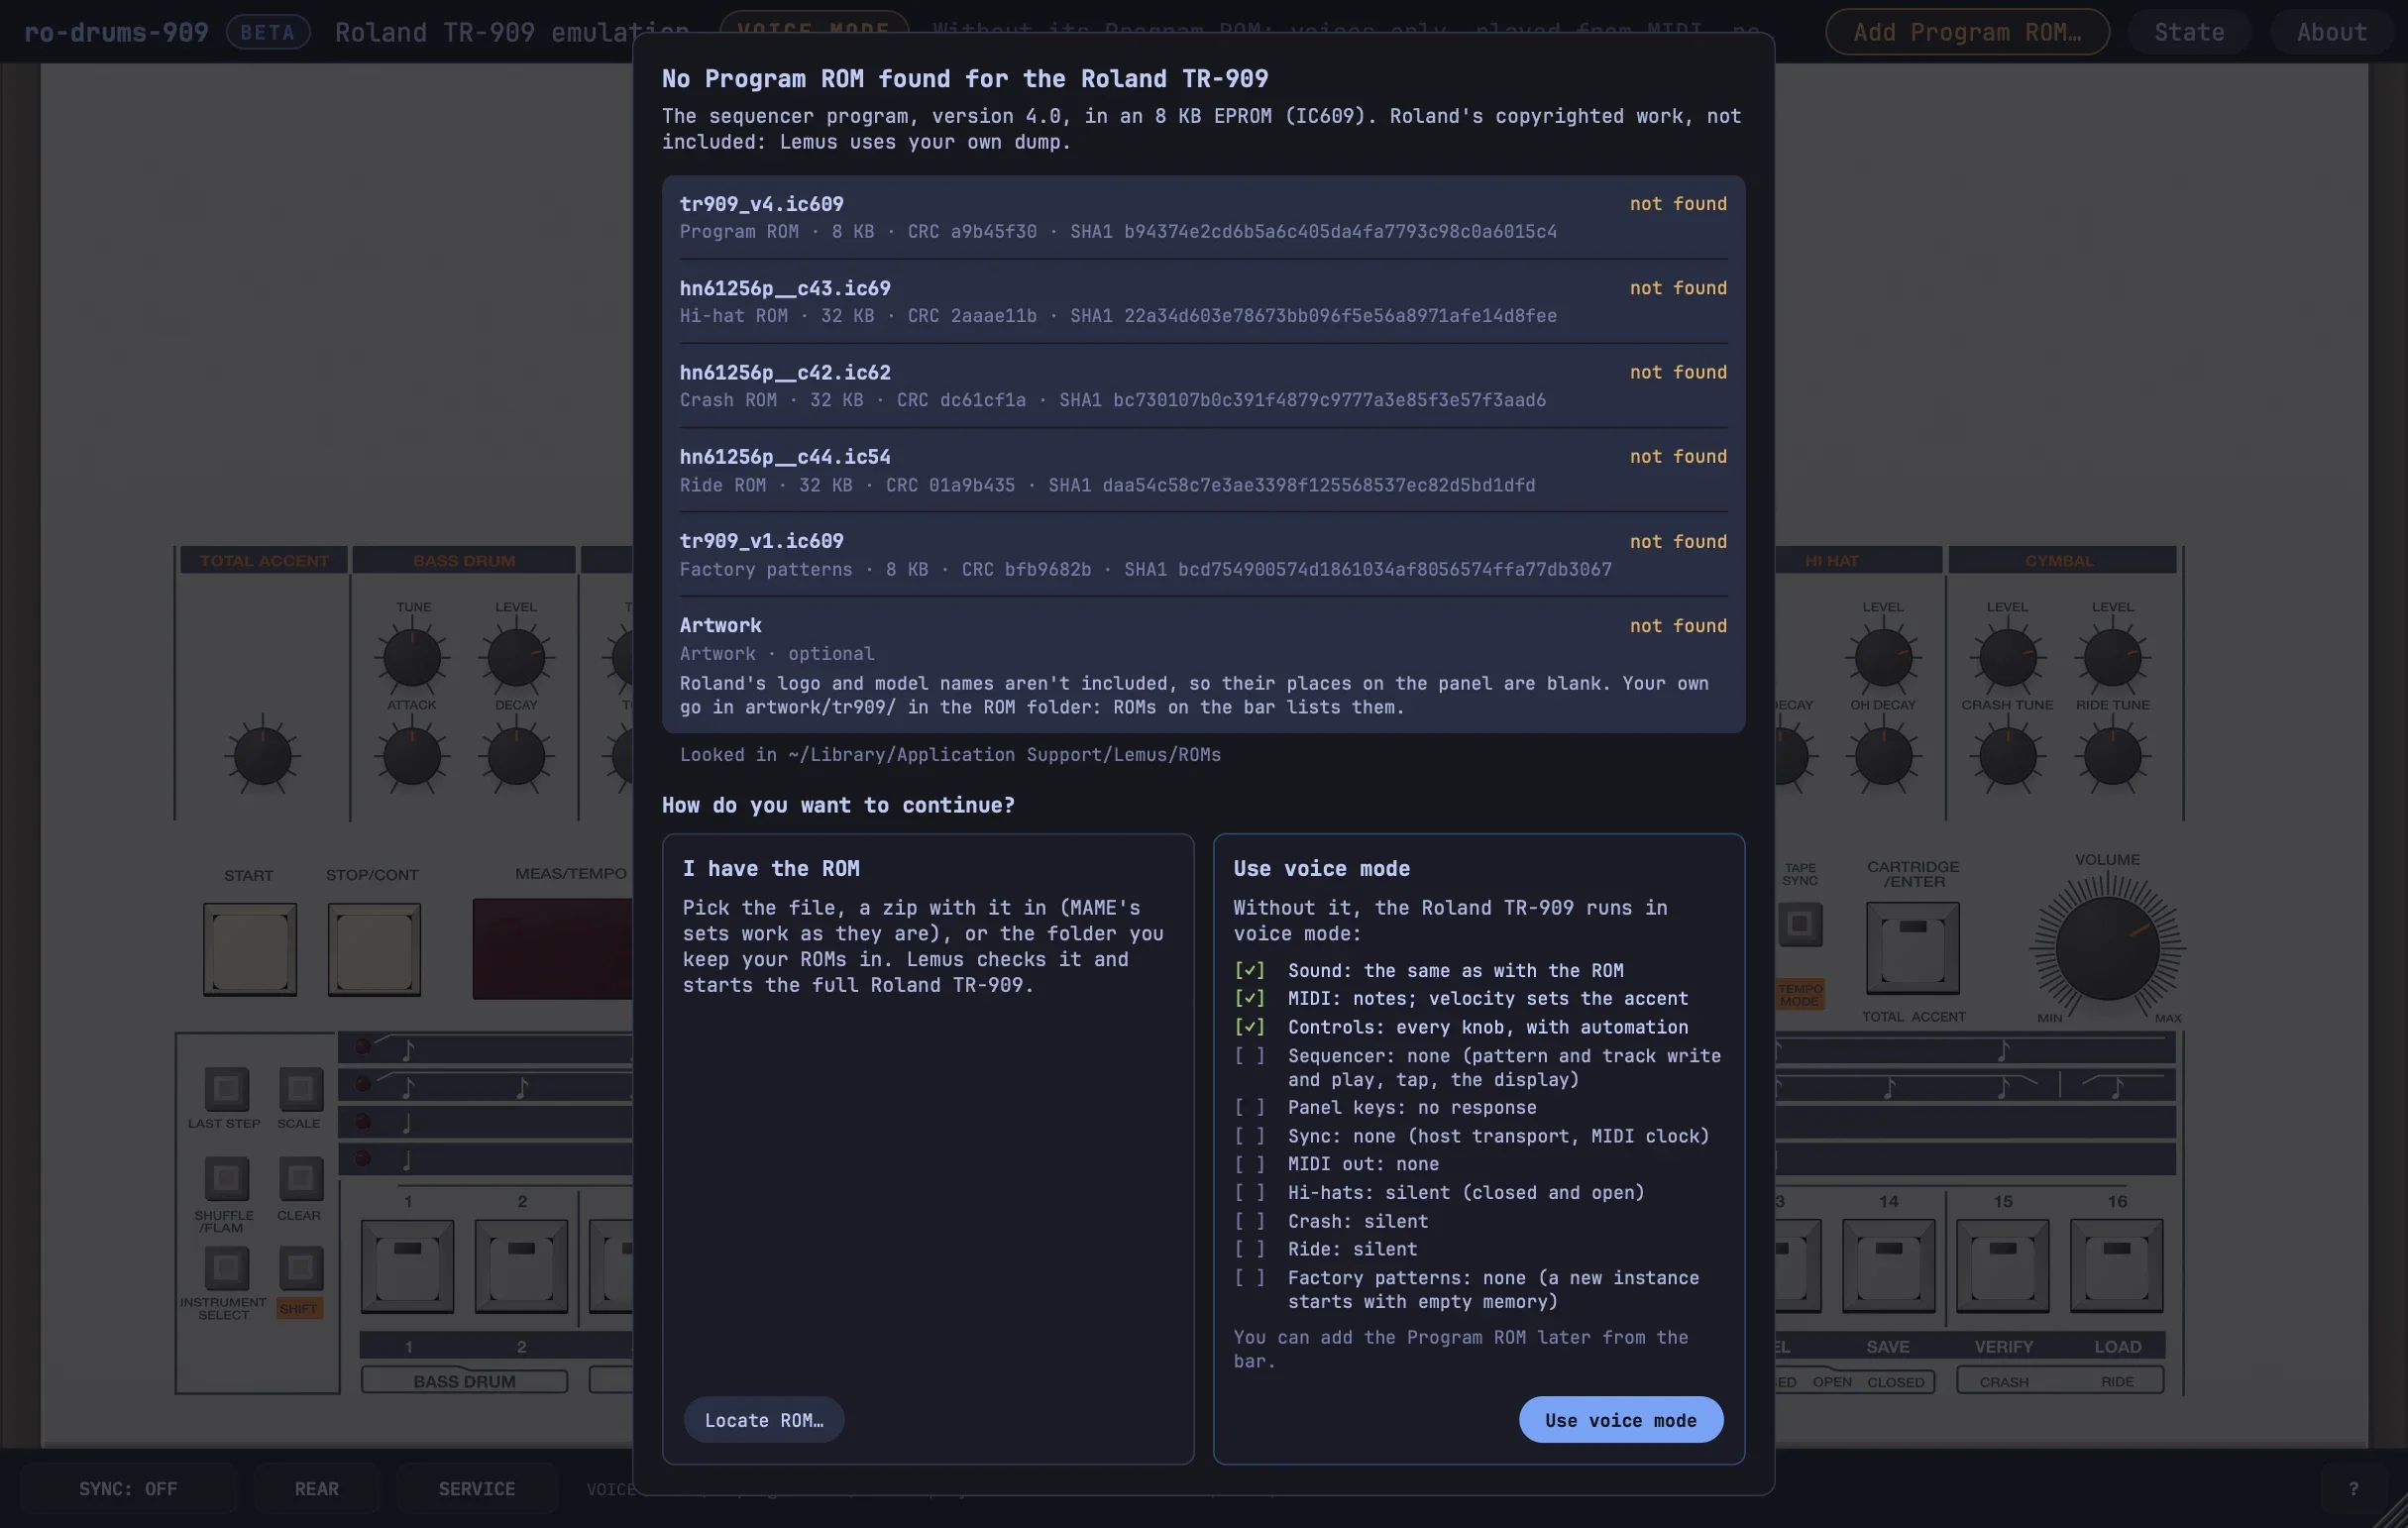
- I have the ROM (Locate ROM…) takes a ROM image, a zip holding them such as MAME's tr909.zip, or a folder. A file is checked and copied into the ROM folder; a folder becomes the ROM folder. The full TR-909 starts at once, settings kept.
- Use voice mode carries on without it.
The prompt doesn't come back, unless the program ROM goes missing after ro-drums-909 has run with it. In voice mode the top bar keeps Add Program ROM….
The ROMs
The five images in MAME's tr909 set, each found by checksum anywhere in the ROM folder. All are optional.
| File | What | Without it |
|---|---|---|
| tr909_v4.ic609 | The sequencer program, version 4.0 (IC609, 8 KB) | Voice mode |
| hn61256p__c43.ic69 | The hi-hat's samples (IC69, 32 KB) | No hi-hats, closed or open |
| hn61256p__c42.ic62 | The crash's (IC62, 32 KB) | No crash |
| hn61256p__c44.ic54 | The ride's (IC54, 32 KB) | No ride |
| tr909_v1.ic609 | The sequencer program, version 1.0 (8 KB): it makes the factory patterns | No factory patterns |
tr909_v4.ic609 · 8,192 bytes · CRC a9b45f30
SHA1 b94374e2cd6b5a6c405da4fa7793c98c0a6015c4
hn61256p__c43.ic69 · 32,768 bytes · CRC 2aaae11b
SHA1 22a34d603e78673bb096f5e56a8971afe14d8fee
hn61256p__c42.ic62 · 32,768 bytes · CRC dc61cf1a
SHA1 bc730107b0c391f4879c9777a3e85f3e57f3aad6
hn61256p__c44.ic54 · 32,768 bytes · CRC 01a9b435
SHA1 daa54c58c7e3ae3398f125568537ec82d5bd1dfd
tr909_v1.ic609 · 8,192 bytes · CRC bfb9682b
SHA1 bcd754900574d1861034af8056574ffa77db3067
Voice mode
Without the program ROM, ro-drums-909 is the TR-909's voicing board, played from MIDI: the same sound, without anything the CPU does.
| With the program ROM | Voice mode | |
|---|---|---|
| Sound | The voicing board | The same |
| MIDI notes | Through the firmware's MIDI IN | Straight to the voices, with the firmware's velocity laws |
| Knobs, controllers, automation | Yes | Yes |
| Sequencer and display | The original firmware | No |
| Panel keys and LEDs | Work as on the unit | No effect |
| SYNC, MIDI out | Yes | No |
A session keeps its pattern memory in voice mode. Adding the program ROM later switches it to the full machine, keeping its knobs and memory. Without a sample ROM, its voice is silent, and the status line says which: no HI HAT/CRASH/RIDE ROM.
Adding ROMs later
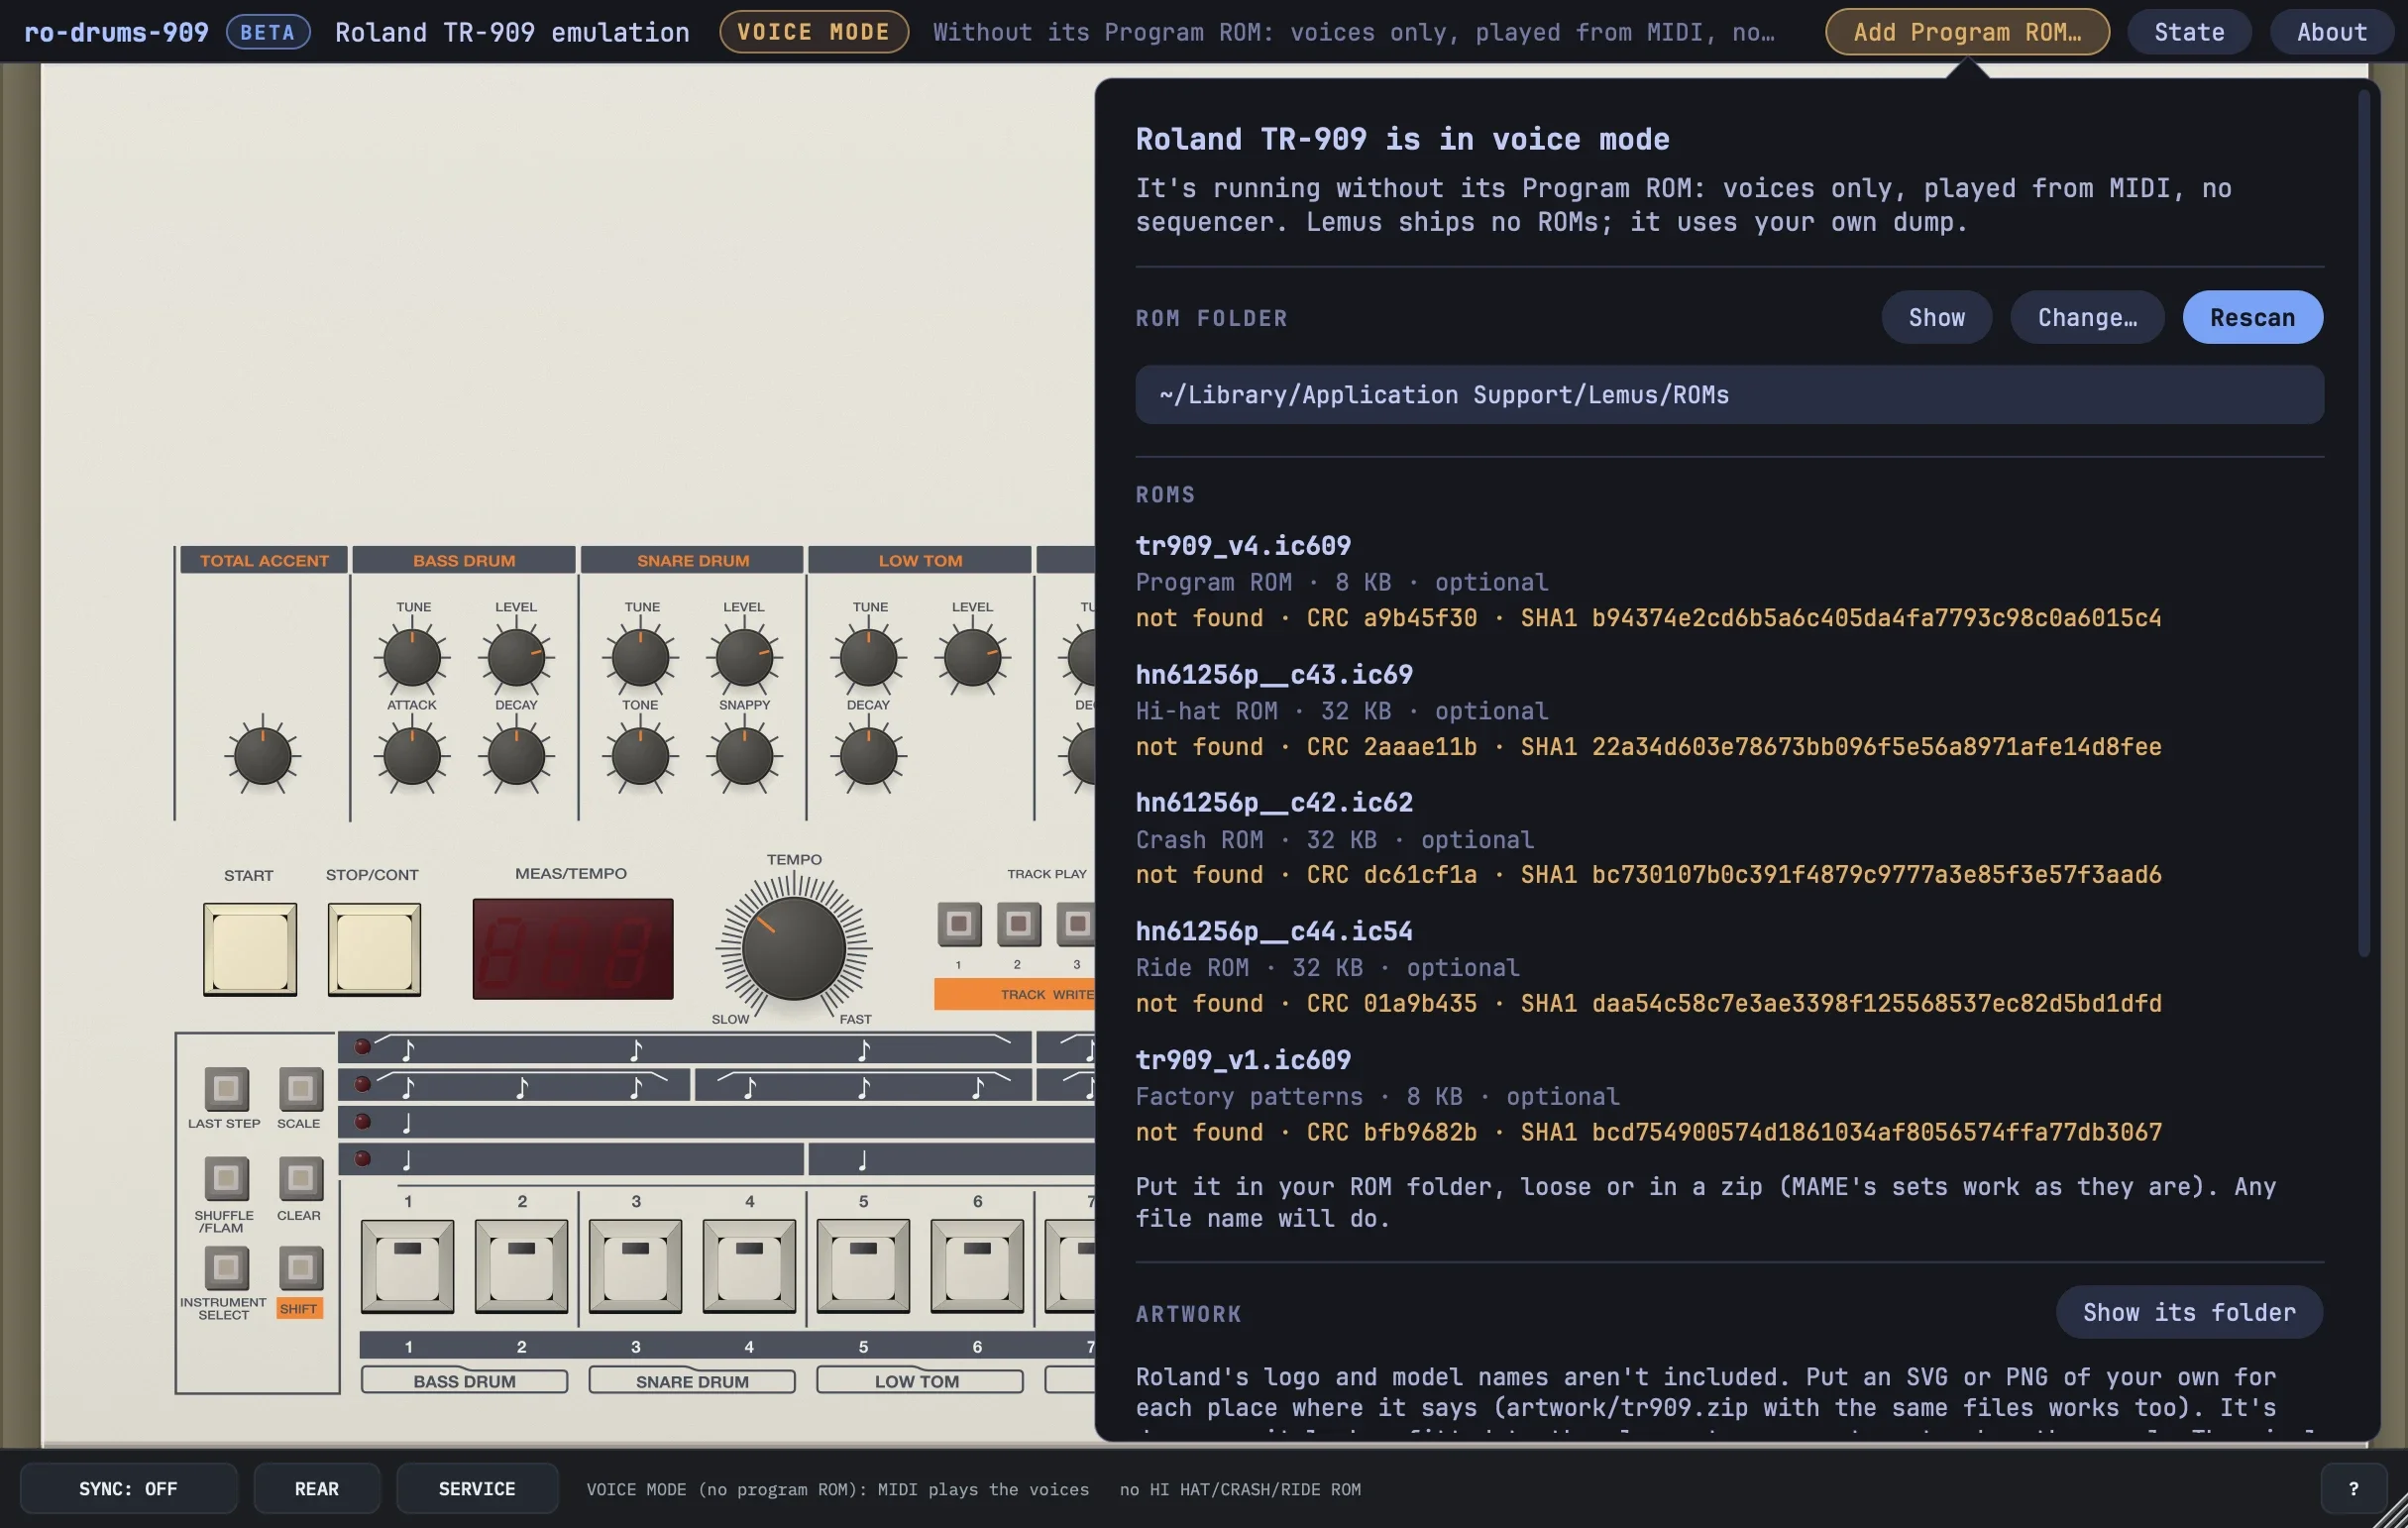
- Click Add Program ROM… 1 in the top bar (with the program ROM in place, the same button is ROMs).
- Put the ROMs in the folder shown, or choose your own with Change….
- Click Rescan. ro-drums-909 reloads with them.
The factory patterns
A new TR-909 held a demonstration in Bank I: patterns 1 to 8 of pattern group 1, and track 1, 65 measures from pattern 5, with a stored tempo of 110 BPM. Version 4.0 of the program dropped it. With tr909_v1.ic609 in the ROM folder, Lemus makes that memory as the service notes say, by starting the 1.0 program with TRACK 1 and PATTERN 1 held, and plays it on 4.0.
- A new instance holds them, and so does State: Reset. Without the 1.0 ROM, a new instance's memory is empty.
- START plays track 1. TEMPO + TRACK 1 selects it at its stored 110 BPM.
Panel artwork
The four blank places take an SVG or PNG of your own each, named as below, in artwork/tr909/ in the ROM folder (how artwork files work). ROMs in the top bar lists them with what each has, opens the folder with Show its folder, and reads it again with Rescan.
| File | Place | Size | A sharp PNG |
|---|---|---|---|
| maker.svg or .png | Roland logo | 80.5 × 12.6 mm | 805 × 126 px |
| model.svg or .png | TR-909 | 107.9 × 15.6 mm | 1079 × 156 px |
| name.svg or .png | Rhythm Composer | 135.5 × 6.9 mm | 1355 × 69 px |
| rear_maker.svg or .png | Roland logo, rear panel | 110.0 × 22.0 mm | 1100 × 220 px |
- artwork/tr909.zip holding the same files works too.
- A tr909.svg still fills the places without a file: its elements roland, tr909 and rhythm_composer, in panel millimetres, filled in the print colour. The rear place takes its roland, in the rear's grey.
Your first sound
- From MIDI, in both modes: see MIDI notes.
- From the sequencer, with the program ROM: with the factory patterns, START plays track 1. Without them the memory is empty, as on a new unit with version 4.0: write a pattern first. With SYNC: HOST, START does nothing: the DAW's transport runs it.
The panel at a glance
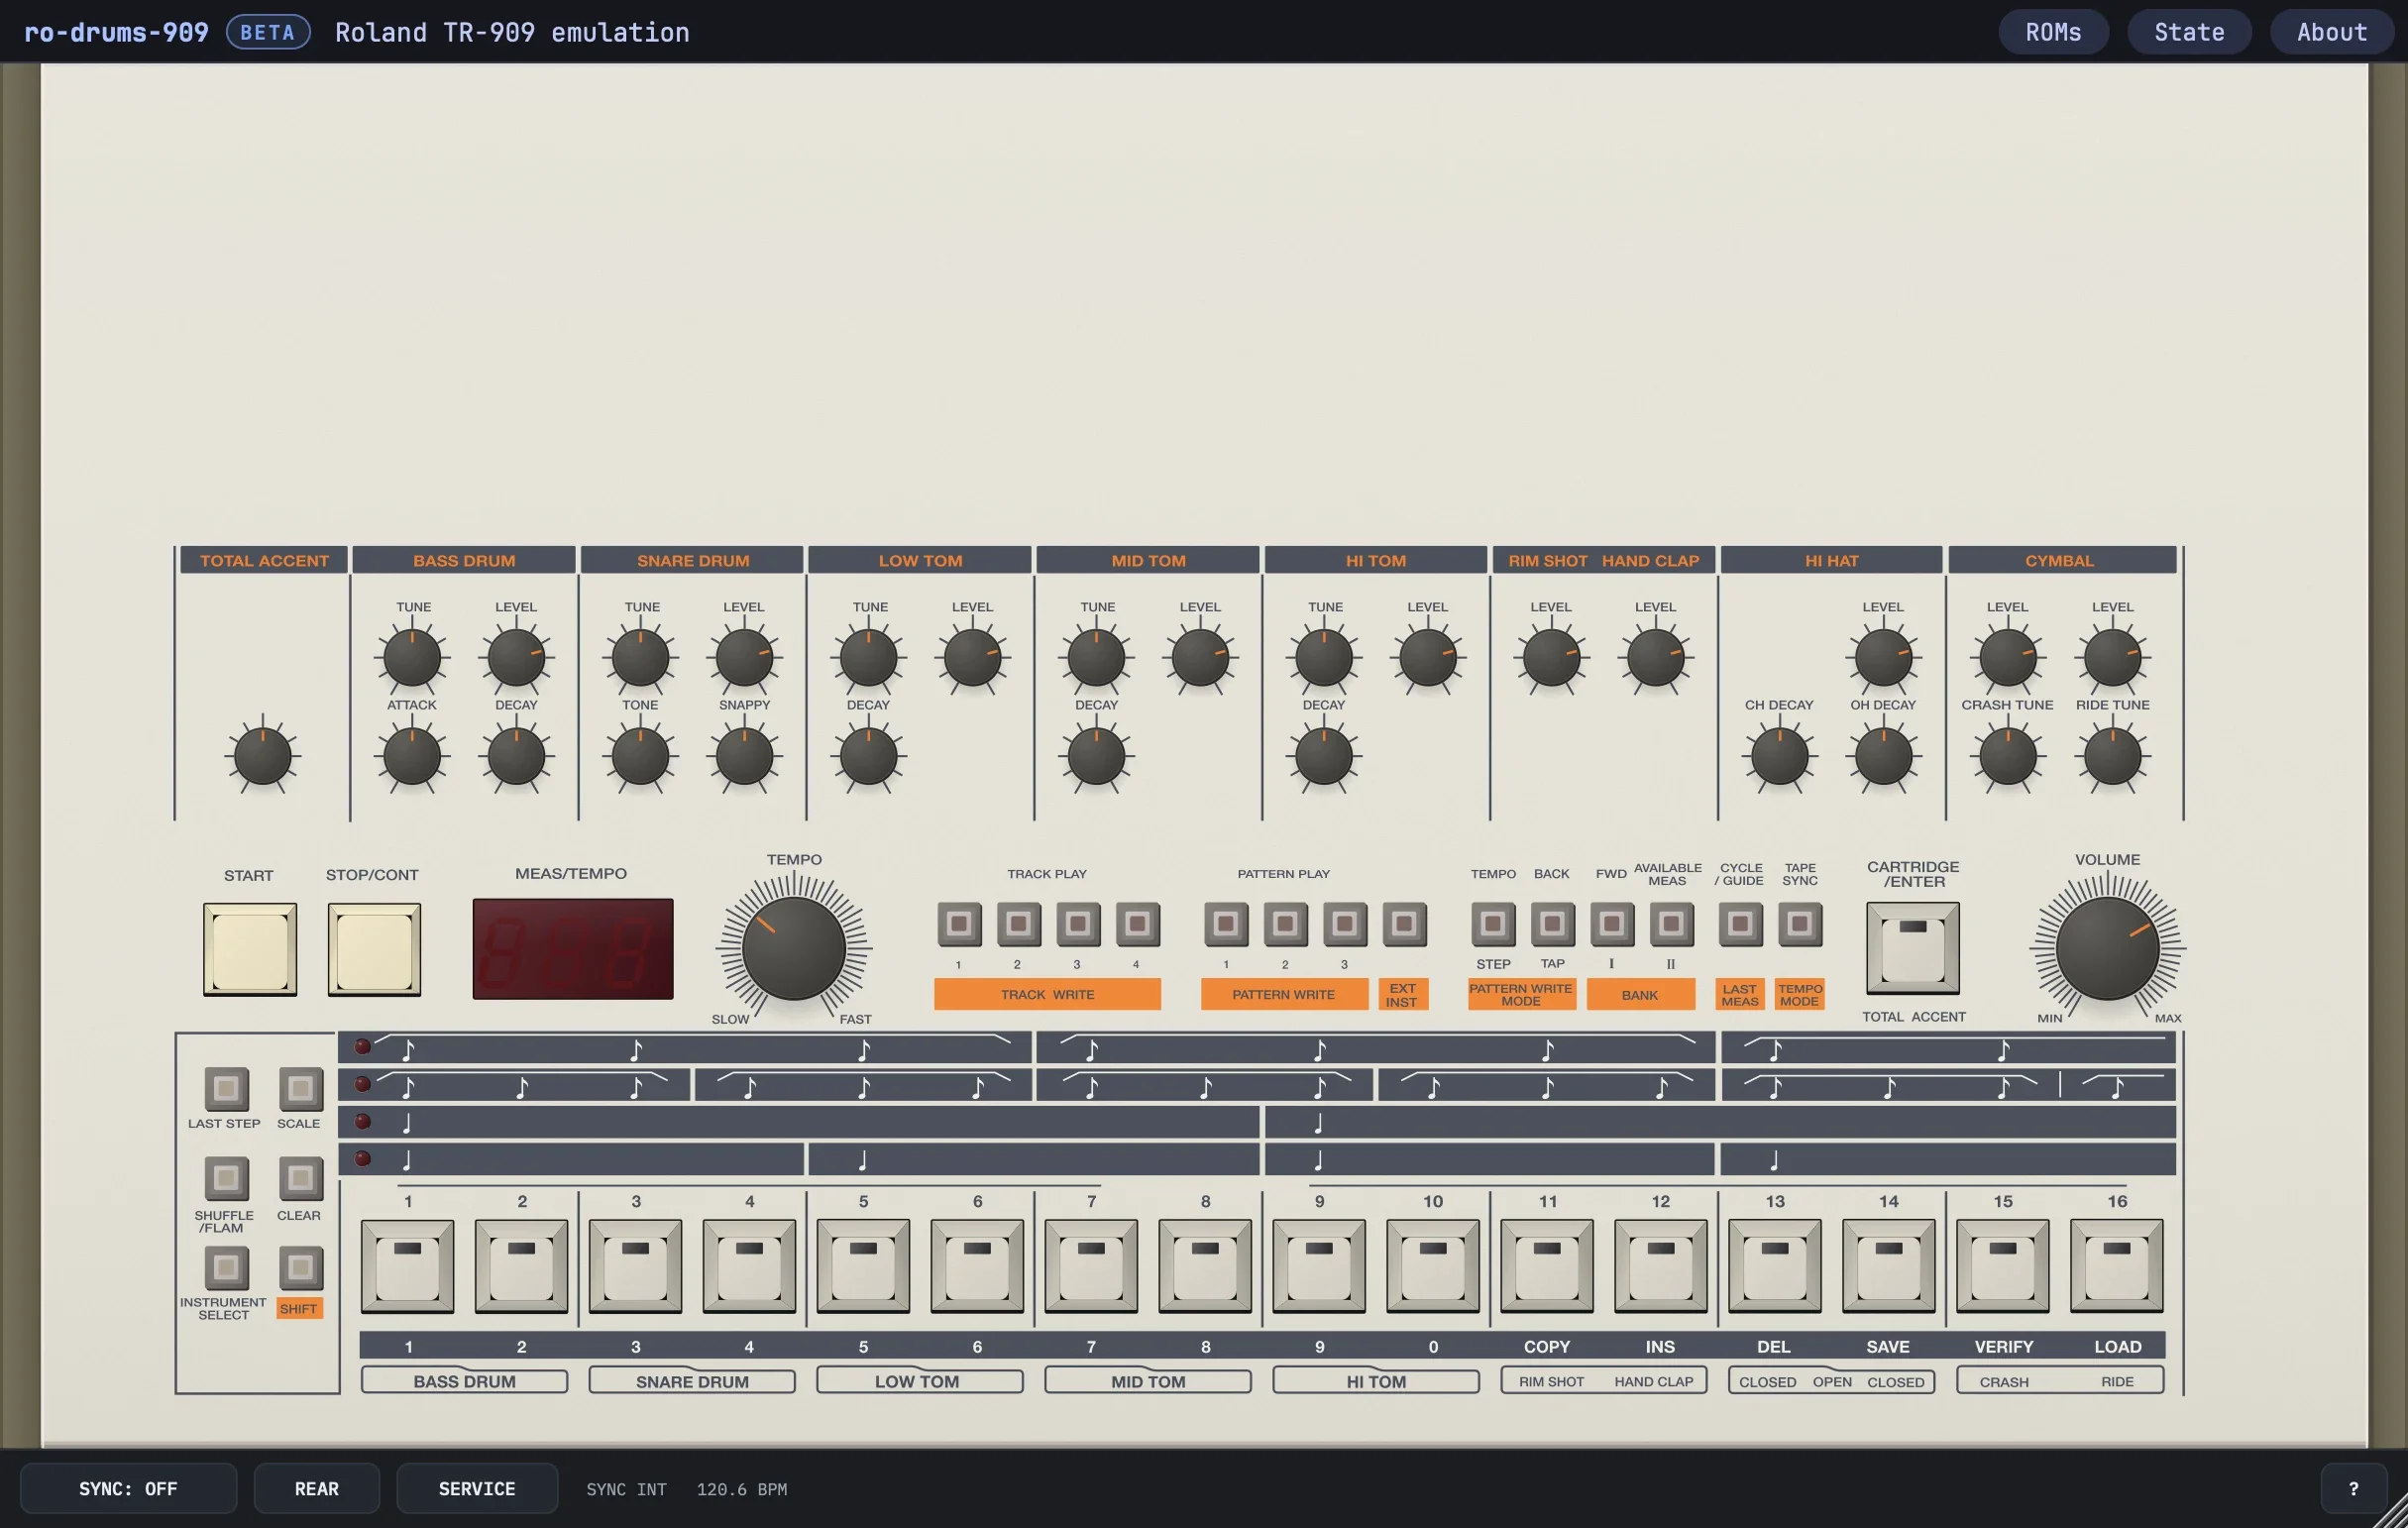
Drawn from photos of the original and the service notes' board artwork, to within about 0.3 mm.
- 1 TOTAL ACCENT
- How much a step with TOTAL ACCENT raises every voice on it, read as the step plays.
- 2 Voice knobs
- BASS DRUM: TUNE, LEVEL, ATTACK, DECAY. SNARE DRUM: TUNE, LEVEL, TONE, SNAPPY. Each tom: TUNE, LEVEL, DECAY. RIM SHOT and HAND CLAP: LEVEL. HI HAT: LEVEL, CH DECAY, OH DECAY. CYMBAL: CRASH and RIDE, LEVEL and TUNE. All 0 to 10; the LEVELs start at 7.5, the others at 5.
- 3 START, STOP/CONT
- START plays from the top. STOP/CONT stops, and pressed again continues where it stopped. Neither works in MIDI sync.
- 4 MEAS/TEMPO
- The measure of a track; the tempo while TEMPO is held; the measures left while AVAILABLE MEAS is.
- 5 TEMPO
- 36 to 290 BPM, about 120 by default. Ignored in MIDI sync, and while a track's stored tempo is in use.
- 6 TRACK PLAY 1–4
- Selects a track of the bank. With SHIFT: TRACK WRITE.
- 7 PATTERN PLAY 1–3, EXT INST
- Selects a pattern group; a step key then picks the pattern. With SHIFT: PATTERN WRITE in that group, and EXT INST switches the step keys to the external instruments.
- 8 TEMPO, BACK, FWD, AVAILABLE MEAS
- TEMPO shows the tempo and stores it in a track; BACK and FWD step through a track's measures; AVAILABLE MEAS shows the measures left. With SHIFT: STEP and TAP, the pattern write modes; BANK I and II.
- 9 CYCLE/GUIDE, TAPE SYNC
- CYCLE repeats a track; in tap write, GUIDE is the metronome. TAPE SYNC makes START wait for a tape's sync tone: there is no tape input, so nothing plays until STOP/CONT leaves it. With SHIFT: LAST MEAS, and TEMPO MODE.
- 10 CARTRIDGE/ENTER
- ENTER for measure numbers, chains, copies and track writing. With INSTRUMENT SELECT: TOTAL ACCENT. No cartridge is emulated: the 909 finds none inserted.
- 11 VOLUME
- The master outputs' level, 7 by default.
- 12 LAST STEP, SCALE, SHUFFLE/FLAM, CLEAR, INSTRUMENT SELECT, SHIFT
- SCALE steps the pattern's scale. The others are held while another key is pressed.
- 13 Scales
- 16th, 32nd, 8th triplet and 16th triplet; the lamp at the left shows the pattern's.
- 14 Step keys 1–16
- Write steps, and pick a pattern, a voice, a shuffle or flam setting, a last step or a MIDI channel. Their LEDs show the steps: dim for a normal note, bright for an accent.
- 15 Under the step keys
- The digits 1 to 9 and 0 for measure numbers; COPY, INS and DEL for editing; SAVE, VERIFY and LOAD for the tape; and which keys write which voice.
- 16 Bottom bar
- SYNC, REAR and SERVICE: see the bottom bar.
SAVE runs with no tape. VERIFY and LOAD wait for a tape's pilot tone that never comes, MIDI frozen meanwhile: step key 1 cancels, the memory untouched.
The sequencer
How it's organised
- 2 banks, I and II, each of 3 pattern groups of 16 patterns: 48 patterns a bank.
- A pattern has 1 to 16 steps at one of four scales. It holds the eleven voices (BD, SD, the toms and the closed hat with normal and accent, BD to HT with flam; RS, HC, the open hat, crash and ride on or off), TOTAL ACCENT for each step, 16 external instruments, and its shuffle and flam.
- 4 tracks a bank, 896 measures in all, one pattern a measure, each track with a stored tempo: see Tracks.
- The memory is saved with the session. There is no clearing it all, as on the unit: State: Reset makes a new instance, the factory patterns with it.
Two keys at once
- A key that modifies another (SHIFT, INSTRUMENT SELECT, CLEAR, SHUFFLE/FLAM, LAST STEP) goes down first: pressed in the same scan, the other key may act unmodified.
- A PATTERN PLAY key and the pattern's step key are pressed one after the other, not together; TRACK PLAY too.
- Right-click (ctrl-click on a Mac) a key to hold it until it's clicked again; the status bar names it. The computer's Shift holds SHIFT, and the other computer keys stay down while held.
Play patterns
- Press a PATTERN PLAY key 1 for the group, then a step key 2 for the pattern.
- Press START 3. STOP/CONT stops it; pressed again, it continues where it stopped.
- A pattern chosen while one plays starts at the next bar.
- Two step keys pressed together play the patterns between them in turn.
Write a pattern (step write)
- Stopped, hold SHIFT 1 and press a PATTERN PLAY key 2. Its LED blinks: pattern write, in that group.
- Hold CLEAR 3 and press a step key: that pattern is erased and selected.
- Press START 4. The step LEDs run.
- Hold INSTRUMENT SELECT 5 and press a key of the voice to write, as the legends under the keys show 7.
- Press the step keys 6 to write it.
- BD, SD, the toms and the closed hat: a step key goes none, normal, accent, none, with either key of the voice. The LED is dim for normal, bright for an accent.
- RS, HC, the open hat, crash and ride: on or off. The open hat is the two hi-hat keys together.
- Flam: INSTRUMENT SELECT with both keys of BD, SD or a tom selects its flam for writing.
- TOTAL ACCENT: INSTRUMENT SELECT with ENTER selects it for writing.
Accents
A voice's own accent is a fixed level. TOTAL ACCENT on a step raises every voice on it by the TOTAL ACCENT knob, read when the step plays. With the knob high a voice's accent may not be heard: a normal note at full TOTAL ACCENT is at the accent's level.
Scale and last step
In pattern write, while it runs:
- SCALE steps 16th, 32nd, 8th triplet, 16th triplet and back, and sets the last step to 16, 16, 12 and 12.
- LAST STEP held with step key n: the pattern has n steps.
Shuffle and flam
In pattern write, while it runs, hold SHUFFLE/FLAM 1 and press:
- Step keys 1 to 7 2 for the shuffle: every second 16th is late by the key's number less one, in 48ths of a beat. 1 is none, 7 is a 75 % swing. In 32nds, 1 and 2, 3 and 4, 5 and 6 are the same. No shuffle on triplets, and an odd last step keeps its length.
- Step keys 9 to 16 3 for the flam's interval: 16–20 ms at 9 to 44–49 ms at 16, the same at any tempo. The grace note is on the step at normal level, the main note after it at accent level.
Held, SHUFFLE/FLAM lights the keys of both settings. A flam's interval takes one of two values about 4 ms apart, from how the step falls against the CPU's scan; the high tom always has the longer.
Tap write
- In pattern write, hold SHIFT 1 and press BACK (TAP) 2. BACK lights instead of TEMPO; SHIFT with TEMPO (STEP) goes back to step write.
- Choose the pattern with CLEAR and its step key, and press START.
- CYCLE/GUIDE 3 turns the guide on: a rim shot on every beat, louder on the bar's first.
- Press a voice's key 4 in time: it is written at the nearest step, accented from the voice's left key, normal from its right one.
Held with a voice's key, CLEAR 5 erases that voice as the steps pass, for as long as both are held: with the left key its accented notes, with the right key its normal ones.
Clear, copy, chain
- Clear: CLEAR with a step key erases that pattern's voices and TOTAL ACCENT, and resets it to 16 steps, 16ths, no shuffle and flam key 13. In EXT INST mode it erases the external instruments and their accent only.
- Copy: in pattern write, choose the destination with SHIFT, its PATTERN PLAY key and its step key. Then, with SHIFT held: COPY, the source's bank (BANK I or II), its PATTERN PLAY key, its step key, ENTER. Everything of the pattern is copied, from either bank.
- Chain: in pattern write, hold the step keys at both ends of a run of patterns and press ENTER. Any of them then plays the whole chain from its first. A step key held with ENTER takes its pattern out; the patterns after it stay chained.
External instruments
In pattern write, stopped, SHIFT with EXT INST switches the step keys to 16 external instruments; EXT INST lights. They are written as the voices are, with no flam; INSTRUMENT SELECT with ENTER selects their accent. They play as MIDI notes 36 to 51 on the 909's MIDI out.
Tracks
A track is a list of measures, each one a pattern (its group and number), with a stored tempo. Each bank has four, sharing 896 measures.
Banks
After a TRACK PLAY key, SHIFT with FWD (BANK I) or AVAILABLE MEAS (BANK II) 4 selects the bank; its LED lights. Patterns and tracks are then the bank's.
Play a track
- TRACK PLAY 1 to 4 1 selects a track at its first measure; an empty track shows 0 on the display 3.
- START 2 plays it, and it stops at its end. STOP/CONT stops it and continues.
- CYCLE 5, its LED lit, repeats it. Pressed again while it plays, the track stops at its end.
- From a measure: SHIFT with the measure number from the digits 7, then ENTER 6, then STOP/CONT. START still plays from measure 1.
The display shows the measure playing, and the tempo while TEMPO is held.
Write a track
- Hold SHIFT and press TRACK PLAY 1 to 4: track write.
- To clear the track first: with SHIFT held, DEL, LAST MEAS, ENTER.
- Press START.
- For each measure, press a PATTERN PLAY key, the pattern's step key, then ENTER. The display shows the next measure's number.
Two step keys pressed together enter the patterns between them, a measure each. AVAILABLE MEAS, held, shows the measures left of the bank's 896. When none are left it shows 0, and ENTER shows 0 and adds nothing.
Edit a track
In track write:
- Replace: START, FWD (or ENTER) to the measure, the new pattern, ENTER. BACK steps back a measure. The count stays.
- Go to a measure: SHIFT with its number, then ENTER.
- Delete: from that measure, with SHIFT held, DEL, ENTER deletes it; DEL, a number, ENTER deletes up to that measure; DEL, LAST MEAS, ENTER to the end.
- Insert: go to the measure, select the pattern, and with SHIFT held, INS, ENTER: it goes in before that measure.
- Copy: go to the destination; with SHIFT held, COPY, the first measure's number, ENTER, the last's, ENTER. A copy of those measures goes in there.
Tempo memory
- TEMPO with ENTER stores the tempo in the selected track.
- TEMPO with TRACK PLAY 1 to 4 selects the track at its stored tempo; the TEMPO knob then does nothing.
- Holding TEMPO and turning the knob gives the tempo back to the knob. The stored tempo stays: TEMPO with the track's key recalls it again, and TEMPO with ENTER replaces it.
Where the firmware differs from the manual
Every procedure in the owner's manual behaves as it says, but for these, which are the version 4.0 firmware's own and are kept:
| Procedure | The manual | The firmware |
|---|---|---|
| Track copy of one measure | "Skip assigning the last measure" | Nothing is copied |
| CLEAR in tap write | "3 or 4" for SD | The left key erases the accented notes, the right key the normal ones |
| Erasing the tempo memory | Erases it | The knob takes over; the stored tempo stays |
| CLEAR in EXT INST mode | Scale, last step, shuffle and flam remain | They remain, and so do the voices |
| MIDI system reset (FF) | Recognised | Passed to MIDI out, no other effect |
The rear
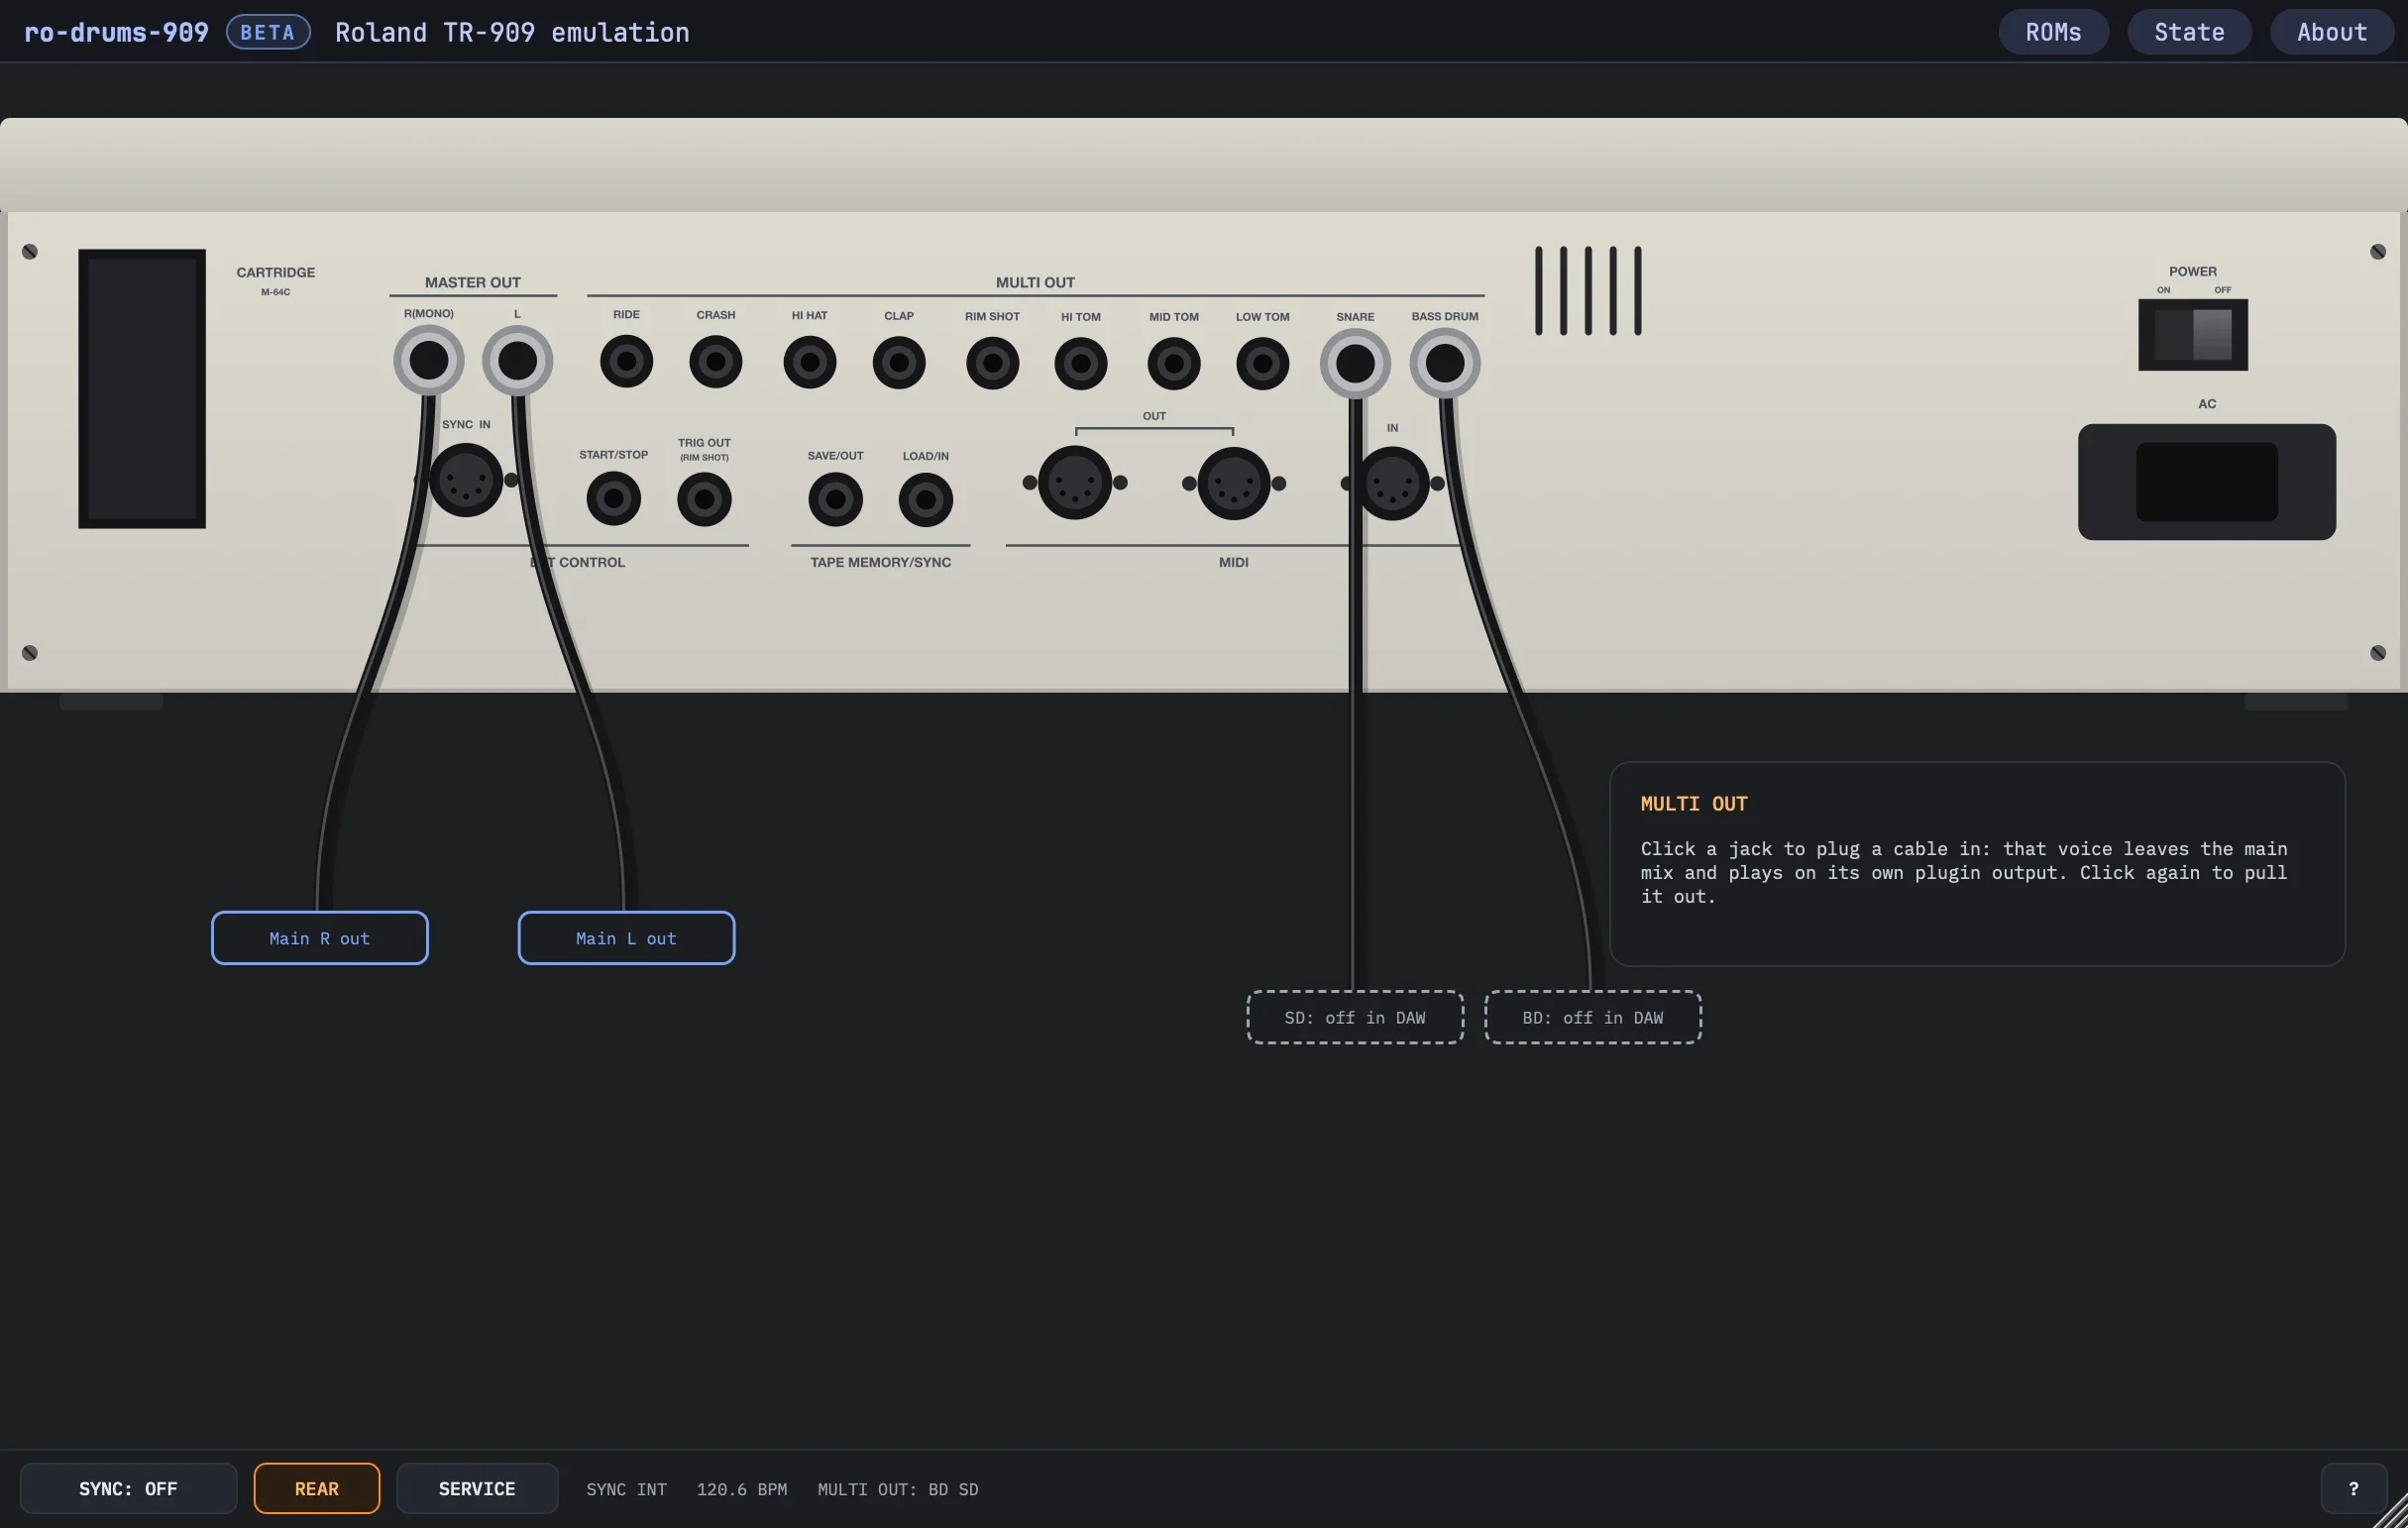
REAR in the bottom bar shows the rear panel.
MULTI OUT
- A click on a MULTI OUT jack 1 plugs a cable in: as on the unit, its voice leaves the main mix for its own output. A second click pulls it out. The cables are saved with the session.
- The plugin's outputs: the main pair, MASTER OUT L and R 2, then BD, SD, LT, MT, HT, RS, HC, HH, Crash and Ride. These ten are off until the DAW turns them on, mono or stereo (the jack on both sides).
- With no cable, a voice is in the main pair and its output is silent, whatever outputs the DAW turns on. The label under a cable 3 says when the DAW has its output off.
- The main pair has the jack board's fixed panning: the low tom and ride left, the high tom and the hi-hats right, the crash a little right. The MULTI OUTs are inverted against it, as on the unit.
The other jacks take no cable: MIDI goes through the DAW (see MIDI); SYNC IN, START/STOP, TRIG OUT, the tape jacks and the cartridge slot aren't emulated.
POWER
The POWER switch 4 turns the 909 off, silent with the panel dark and its memory kept, and on again. Switching it on is the unit's power-on: the program boots for 0.6 s, the master outputs are muted for about 2 s while C143 charges, and the hi-hat, crash and ride thump at their MULTI OUTs as their stages charge.
A new instance, a session load and State: Reset start as a 909 that has been on a while, playable at once. A session always loads switched on.
The bars and SERVICE
The top bar
- BETA after the name: this version is a beta. About shows the version.
- VOICE MODE and a line saying what's missing, while ro-drums-909 runs without its program ROM.
- ROMs: the ROM folder, the five ROMs and the artwork, with their full paths, and Show, Change… and Rescan for the folder. In voice mode it reads Add Program ROM…: see Adding ROMs later.
- State: see State.
- About: the version, the ROM folder and artwork in use, the update check, and links to this guide, the site and the forum. A newer version shows as a button in the bar.
State
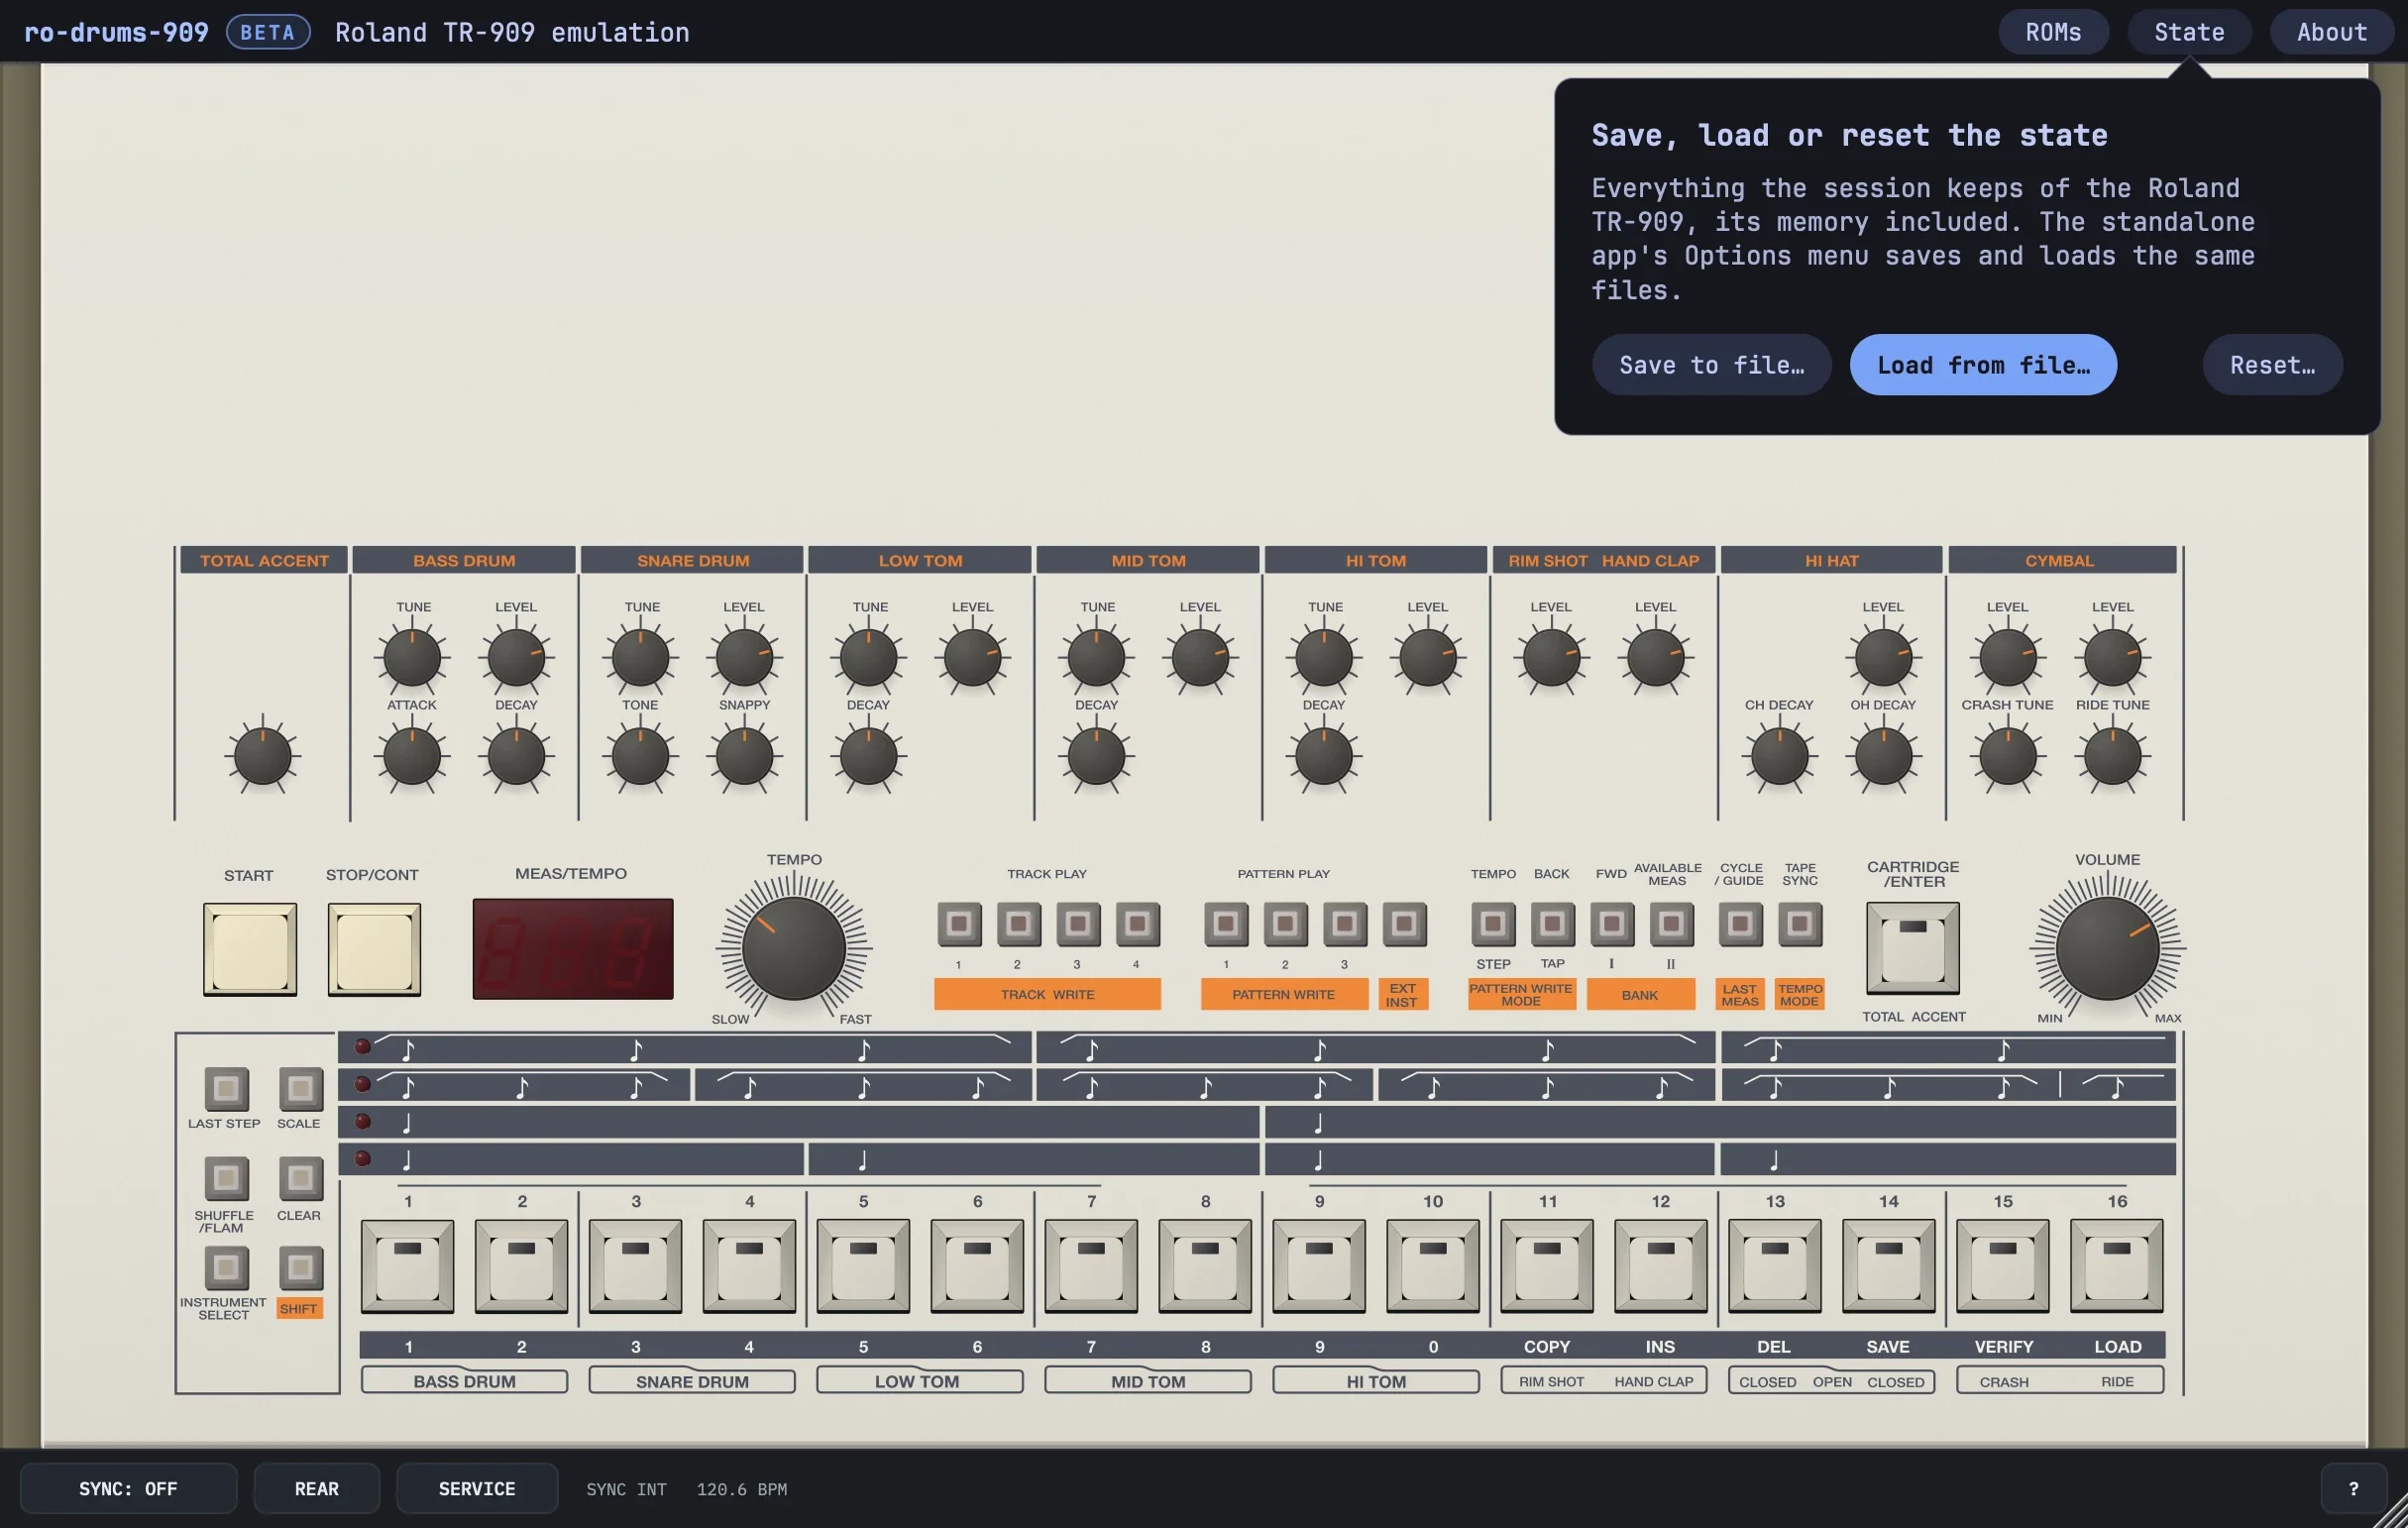
- Save to file… saves the instance: the knobs, the pattern and track memory, the MULTI OUT cables, TM and the serial number in SERVICE.
- Load from file… loads one. The standalone app's Options menu saves and loads the same files.
- Reset… makes it a new instance: the factory patterns, with the version 1.0 ROM, and every control at its default.
The bottom bar
- 1 SYNC
- OFF: the 909 runs on its own clock. HOST: your DAW's transport runs it. See Sync.
- 3 SERVICE
- Takes the top panel off to show the boards. See SERVICE.
- 4 Status line
- The sync mode, INT, MIDI or DIN (HOST while the DAW runs it), and the TEMPO knob's tempo; a missing sample ROM; the MULTI OUTs with a cable in; a key held by a right-click. At the right, the voices sounding.
- 5 ?
- Shows the list of computer keys over the panel. Any click, ? or Escape closes it.
SERVICE: the boards, TM and the scope
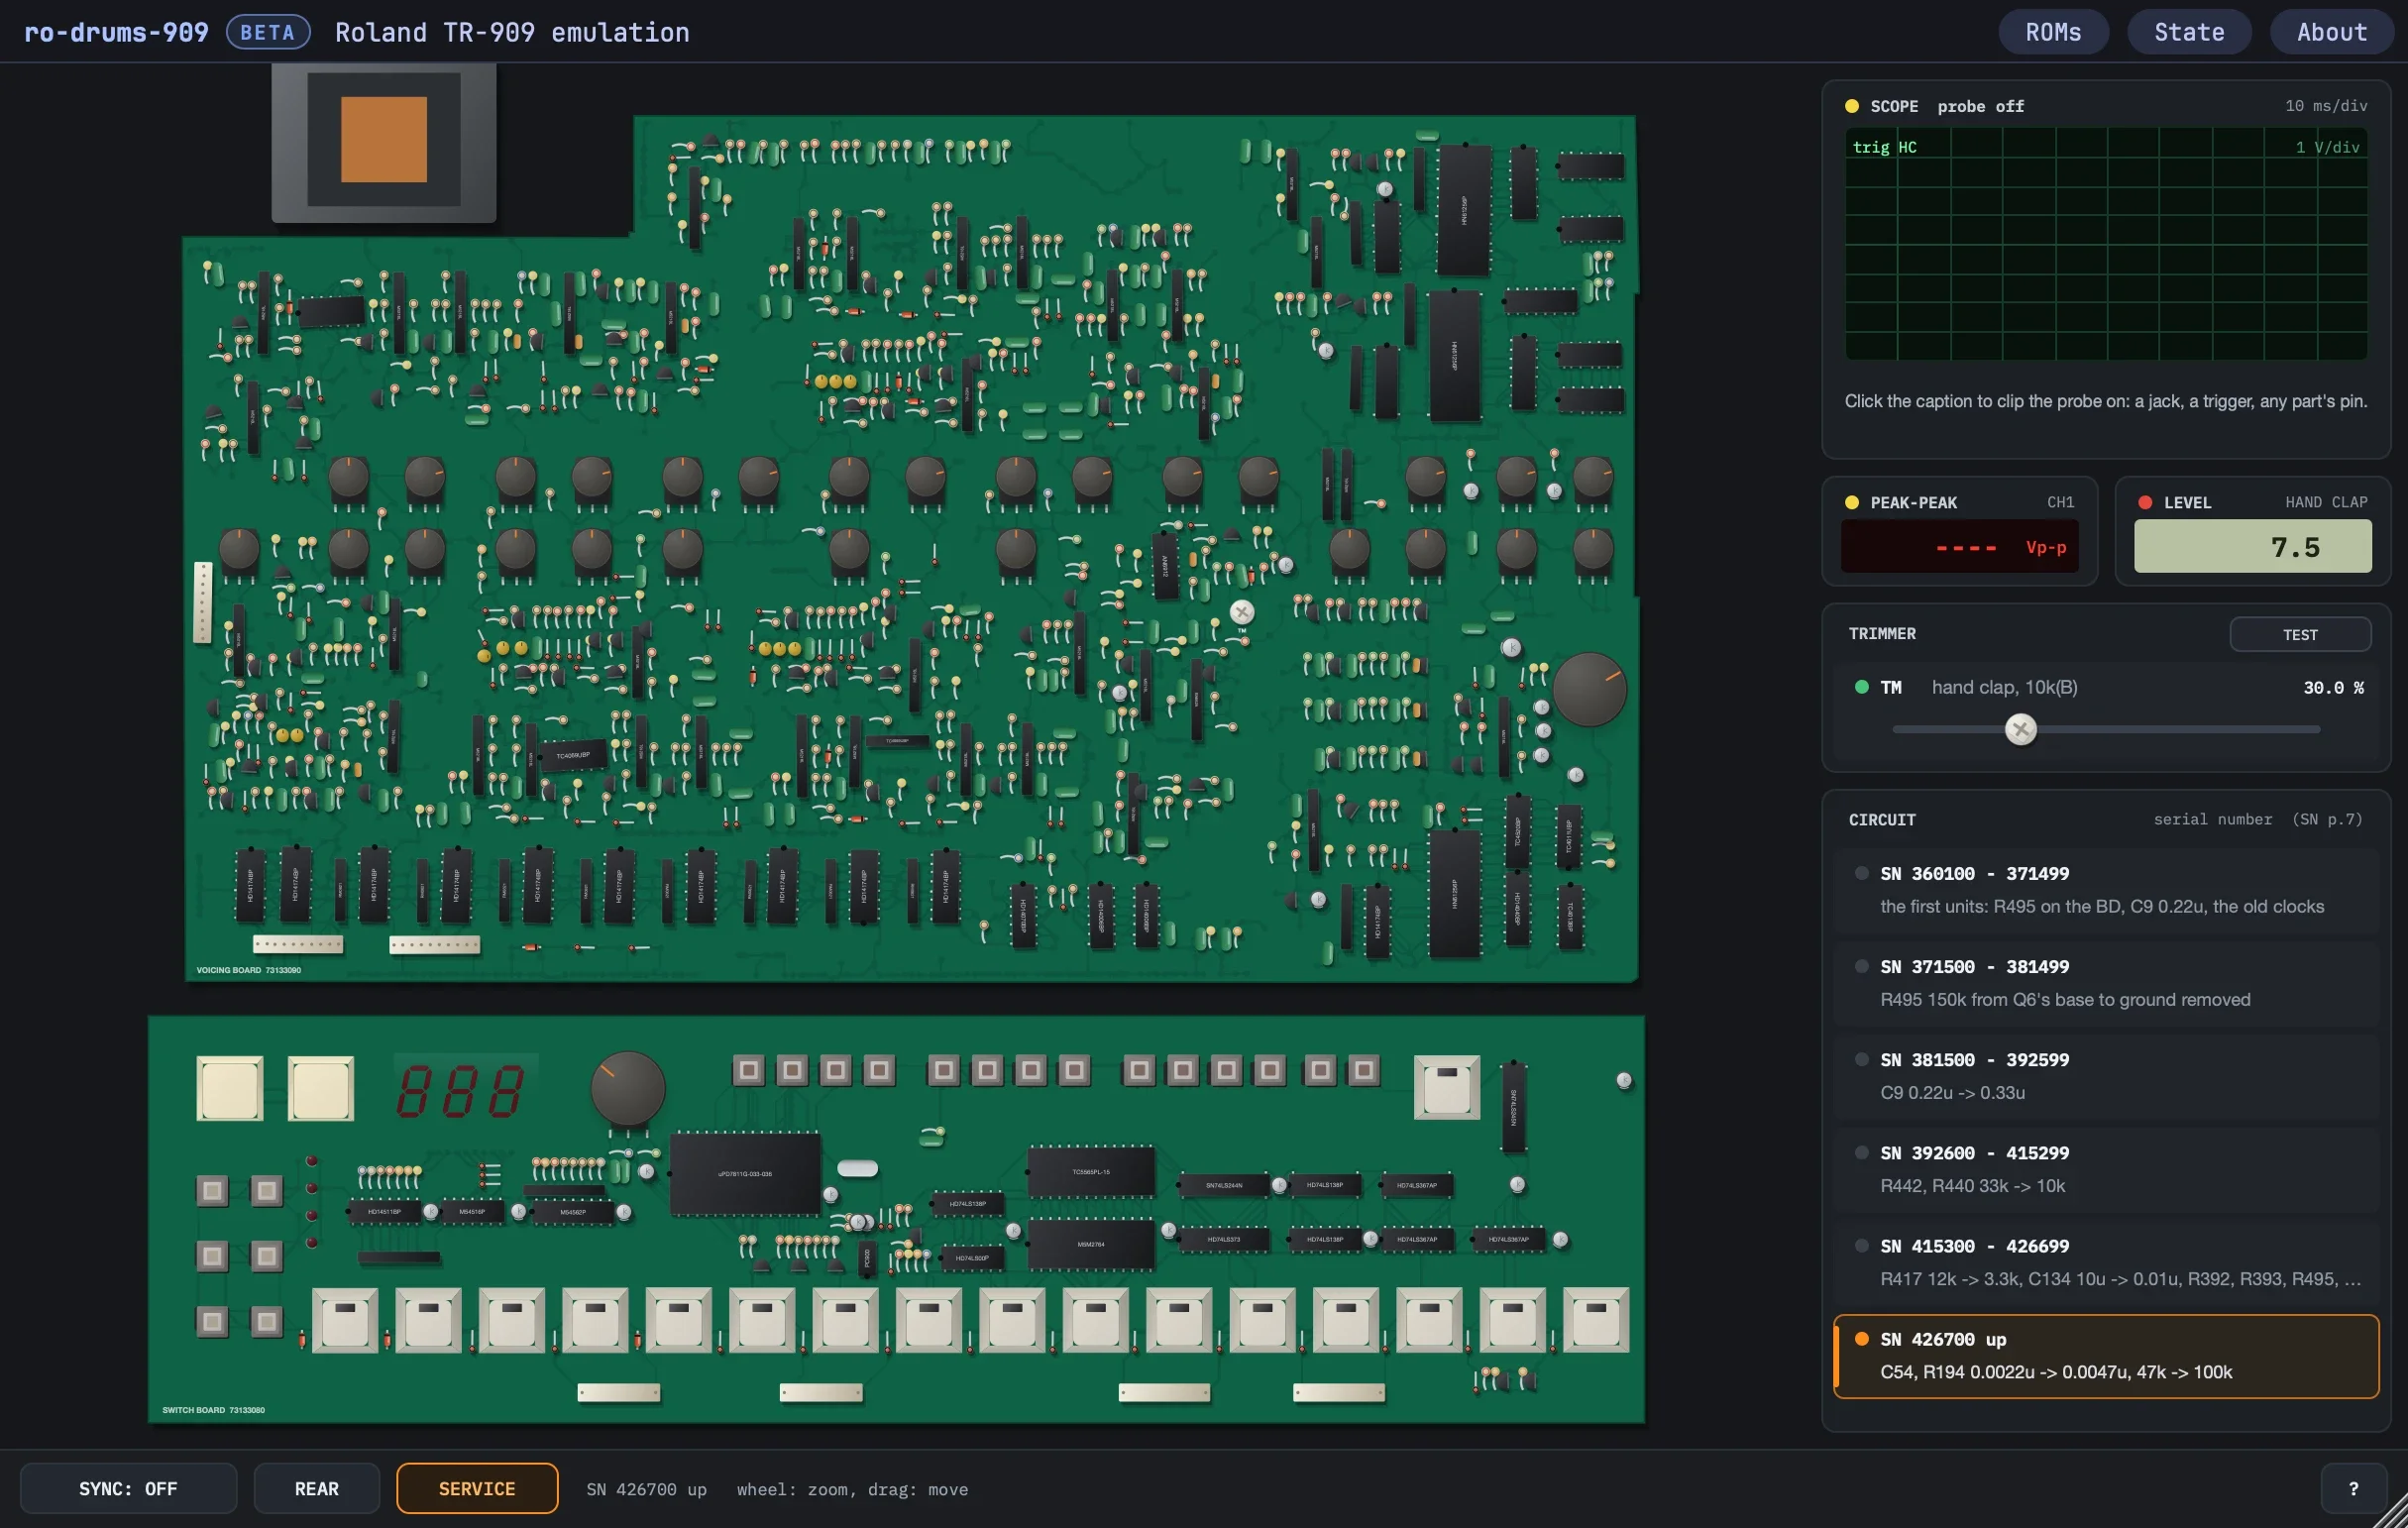
The voicing board where it hangs under the panel and the switch board folded out in front of it, every part where the service notes' board drawings put it, the copper drawn faintly through. The knobs stay on their pots and the keys on their switches, and work as on the panel; the LEDs and the display run. The wheel or a pinch zooms, and the parts' designators show close up; a drag moves; a double-click shows it all.
- The scope 2: click its caption to clip the probe on a MULTI OUT or master jack, a trigger line, an accent DAC, or any pin of any part the netlists draw, by voice, kind, part and pin. It triggers on a voice's TRIG line, or runs free; time and volts per division are set from their captions. The readouts 3 show its peak to peak, and HAND CLAP LEVEL. While a probe is on, the board doesn't sleep.
- TM, the hand clap's trimmer (SN p.11), on the board 1 and as a row 4: drag either, shift finer. A double-click puts it back to the calibrated unit's trim, 30 %. TEST sets the scope on the clap's MULTI OUT at the scale of SN p.9 and plays the clap every 0.6 s.
- Circuit 5: which unit this is, by serial number, from the first units (360100) to the late board (426700 up, the default). Each range has the production changes of SN p.7 up to it: Board revisions. Saved with the session.
The service notes set TM for 2 Vp-p at the clap's MULTI OUT. At its 30 % the model reads about 4 Vp-p there: its clap's spikes are narrower than the calibrated unit's, and at 2 Vp-p (25.5 %) the clap would be 6 dB under the other voices.
MIDI and your DAW
MIDI notes
Notes go into the firmware's own MIDI IN, as on the unit, and play the voices with the firmware's own timing: a hit comes 0.3–2.2 ms after its note.
| Voice | Notes |
|---|---|
| Bass drum | 36, 35 |
| Snare drum | 38, 40 |
| Low tom | 43, 41 |
| Mid tom | 47, 45 |
| High tom | 50, 48 |
| Rim shot | 37 |
| Hand clap | 39 |
| Closed hat | 42, 44 |
| Open hat | 46 |
| Crash | 49 |
| Ride | 51 |
- Velocity sets the voice's accent level through the firmware's own table: 50 is the sequencer's normal level, 80 its accent. Note-offs are ignored.
- The 909 receives on every channel at power-on: see MIDI channels.
- In voice mode, notes play the voices directly, with the firmware's velocity laws as measured.
- MIDI and the sequencer play the same voices.
Controllers
Control changes on any channel move the knobs, on Roland's TR-8 numbers for the same controls. The 909 itself takes none.
| Voice | TUNE | LEVEL | Others |
|---|---|---|---|
| Bass drum | 20 | 24 | ATTACK 21, DECAY 23 |
| Snare drum | 25 | 29 | SNAPPY 26, TONE 28 |
| Low tom | 46 | 48 | DECAY 47 |
| Mid tom | 49 | 51 | DECAY 50 |
| High tom | 52 | 54 | DECAY 53 |
| Rim shot | 57 | ||
| Hand clap | 60 | ||
| Hi-hat | 63 or 82 | CH DECAY 62, OH DECAY 81 | |
| Crash | 83 | 85 | |
| Ride | 86 | 88 | |
| TOTAL ACCENT | 71 | ||
| VOLUME | 7 |
MIDI out
- The plugin's MIDI output is the firmware's MIDI OUT, as on the unit: the external instruments' notes, 36 to 51 on the send channel, and everything received but the clock (the unit's MIDI OUT is a merge).
- The 909 never sends its own voices.
- Its clock, start, stop and song select aren't sent: the DAW has its own transport.
MIDI channels
- At power-on the 909 receives on every channel (omni) and sends on 11. A new instance and a session load start there too.
- In track play, SHUFFLE/FLAM with step key n sets the receive channel to n, omni off.
- In track play, LAST STEP with step key n sets the send channel to n.
Sync
- SYNC: OFF (the default): START, STOP/CONT and TEMPO run the 909's own clock.
- SYNC: HOST: the 909 goes into its MIDI sync mode, as SHIFT with TEMPO MODE puts it, once the sequencer is stopped. The DAW's transport is sent to it as MIDI clock, start, stop and continue: play starts it at the DAW's tempo, stop stops it. START and STOP/CONT do nothing.
- Started from the top of the song, the DAW sends start; from anywhere else, the song position and continue. In track play the 909 goes to that sixteenth of the track, counting each measure at its pattern's length (last step and scale), and plays on from there. In pattern play it ignores the song position and goes on from where the pattern stopped.
Automation and sessions
These parameters can be automated, in this order: BD Tune, BD Level, BD Attack, BD Decay, SD Tune, SD Level, SD Tone, SD Snappy, LT Tune, LT Level, LT Decay, MT Tune, MT Level, MT Decay, HT Tune, HT Level, HT Decay, RS Level, HC Level, HH Level, CH Decay, OH Decay, Crash Level, Crash Tune, Ride Level, Ride Tune, Total Accent, Master Volume, Tempo, Sync to Host and Clap Trim (TM).
A session saves every parameter, the pattern and track memory, the MULTI OUT cables, the serial number in SERVICE and the window size. It loads switched on, as a 909 that has been on a while.
Idle, the voices put out exact zeros and use little CPU, but the CPU keeps running: the sequencer, LEDs and display carry on. ro-drums-909 reports a 2 s tail. Don't let the DAW suspend it on silent tracks, or the 909 can't play its own patterns.
Keyboard and mouse
Computer keys
Click the panel first. Keys stay down while held, so two-key steps work.
| Keys | Panel |
|---|---|
| 1 2 3 4 5 6 7 8 | Step keys 1 to 8 |
| Q W E R T Y U I | Step keys 9 to 16 |
| A S D F | TRACK PLAY 1 to 4 |
| G H J | PATTERN PLAY 1 to 3 |
| K | EXT INST |
| Z X C V | TEMPO (STEP), BACK (TAP), FWD (BANK I), AVAILABLE MEAS (BANK II) |
| B N | CYCLE/GUIDE (LAST MEAS), TAPE SYNC (TEMPO MODE) |
| Return | CARTRIDGE/ENTER (TOTAL ACCENT) |
| Shift | SHIFT, held while the computer's Shift is |
| Backspace, Delete | CLEAR |
| F1 F2 F3 F4 | LAST STEP, SCALE, SHUFFLE/FLAM, INSTRUMENT SELECT |
| , . | START, STOP/CONT |
| Space | START, or STOP/CONT while running, in the standalone app (in a DAW, Space is the DAW's) |
| ? | The key list |
| Escape | Closes the key list and lets go of every key |
Some DAWs keep letter keys for themselves.
Mouse
- Knobs: drag up or down; shift is finer, double-click resets, the wheel works, hover shows the value.
- Keys are held while the button is. A right-click (ctrl-click on a Mac) holds one down until it’s clicked again, and the status bar names it; Escape lets go of all.
- Window: drag the bottom-right corner, half to twice the size.